

PDF documents can be automatically read and converted into structured EDI or XML files with PDF-Mapper. Learn here the 8 simple steps necessary to do this.
To optimize business processes around incoming PDF documents, a converter from PDF to EDI or XML is often needed. These EDI/XML files can be easily processed by ERP systems. The result is an automated process in which PDFs are captured, processed, converted to EDI or XML, and imported into the ERP system without the need for human intervention. However, the conversion is a bit more complicated than from Word to PDF, PNG to JPG or WAV to MP3. For this reason, we will show you in 8 steps how to set up the conversion in PDF-Mapper to automatically process PDF documents.
Background: How to capture PDF documents in a structured way
PDF documents are a common file format for exchanging information, especially in business. But unfortunately PDF is not well suited to exchange information automatically. This is because machines cannot recognize what the various pieces of information mean and where these pieces of information are located on different documents as easily as humans can.
We give a short introduction to PDF format, semantic readout and PDF mapping in the first article of this series: How to Automatically Capture PDFs with PDF Mapping. Read this article first if you want to learn:
- What are the advantages of automatic PDF processing,
- Why PDFs are difficult to capture automatically,
- What solution semantic readout and PDF mapping offer.
Convert PDF to EDI/XML
At this point, however, we would like to turn our attention to the practical application of semantic readout and PDF mapping in the PDF-Mapper software.
PDF-Mapper uses semantic readout (assigning meaning to texts) and PDF mapping (capturing PDF layouts) to automatically and reliably process incoming PDF business documents such as orders, invoices, delivery bills or order confirmations. It converts these PDF documents into EDI or XML files that can be read into ERP and other business systems in a structured workflow.
In this part of our blog articles on PDF mapping we explain how to set up the PDF-Mapper once in order to enable automatic capture, processing and conversion of PDF data. Consequently, you have come to the right place if you want to learn:
- How PDF-Mapper can convert PDFs to structured EDI/XML data for your ERP system,
- Why PDF-Mapper works so reliably with 100% accuracy,
- How you can do the PDF mappings yourself in PDF-Mapper.
Practice while studying
Download PDF-Mapper now and try it for free to see how the process works with your own PDF documents. Follow this link to the PDF-Mapper download and read on here once you're ready to go!
A note on time: usually steps 1-6 take about 5-10 minutes after a bit of practice. Since this article is written for beginners, we explain each process step in great detail. In addition, we also look at some special cases so that you can utilize the full potential of PDF-Mapper.
8 simple steps to automatically process PDF documents:
- Create new partner
- What are we doing here?
- Step by step in PDF-Mapper
- Special case 1.1: Processing different PDF document types of the same partner
- Special case 1.2: A partner sends a PDF document type in multiple layouts
- Special case 1.3: Multiple partners send PDF documents with the same layout
- Choose document type
- What are we doing here?
- Step by step in PDF-Mapper
- Special case 2.1: An uploaded PDF document does not recognize texts/text boxes
- Identify partner
- What are we doing here?
- Step by step in PDF-Mapper
- Special case 3.1: Make the partner identification more precise by specifying the position
- Assign areas
- What are we doing here?
- Step by step in PDF-Mapper
- Special case 4.1: A PDF document has no footer after the position area
- Special case 4.2: A PDF document was made digitally readable with OCR text recognition
- Special case 4.3: A PDF document has centered text boxes instead of left- or right-aligned ones
- Special case 4.4: The capture range should be changed only for one captured field
- Map fields
- What are we doing here?
- Step by step in PDF-Mapper
- Digression: Mapping rules and regular expressions for special cases
- Special case 5.1: Data must be clearly recognized by its pattern
- Special case 5.2: Text boxes must be merged
- Special case 5.3: Danger of mixing up item numbers
- Special case 5.4: An address has different number of lines from PDF to PDF
- Test and customize mapping
- What are we doing here?
- Step by step in PDF-Mapper
- Digression: Function blocks
- Example 6.1: Automatically format a date
- Example 6.2: Automatically remove unnecessary texts
- Example 6.3: Automatically split addresses
- Enable ERP Integration
- What are we doing here?
- Step by step in PDF-Mapper
- Special case 7.1: Multiple interfaces for various PDF document types
- Configure validation
- What are we doing here?
- Step by step in PDF-Mapper
- Special case 8.1: Be notified by email about faulty documents
- Result: Automatically process incoming PDF documents in the background
- What is our result?
- What happens in PDF-Mapper?
- How can I get started?
Before we start semantically reading a PDF document (step 5), we first configure a few basic settings in the PDF mapping process. The PDF mapping is completed by setting the ERP integration and validation. Steps 1-6 are done once per PDF layout, steps 7-8 once per interface of your ERP or other business system. Afterwards, the PDF-Mapper processes all incoming PDF documents of the configured PDF layouts fully automatically in the background on your computer or server.
1. Create new partner
What are we doing here?
Each customer or supplier usually has a fixed, consistent layout for their respective PDF documents. Nowadays, the documents are automatically generated in the various software applications and filled with the relevant order, invoice or other data. Unfortunately, each company usually uses its own layout, so you get differently styled PDF documents from each customer and supplier.
To reliably process PDF documents automatically, a PDF mapping must be set up for each PDF layout – a “map” of the PDF layout, so to speak, in which the coordinates of the various data are stored. Subsequently, the “map” of customer A’s PDF layout can then be used to automatically capture and process all incoming PDF orders of A. The “map” of supplier B’s PDF layout automatically captures and processes all incoming PDF invoices from B. And so on…
We create a partner in the first step to enable PDF-Mapper to assign all incoming PDF documents of customer A to the same customer A in your ERP system. It is sufficient to enter the company name and the matching ERP ID of the partner (e.g. customer, debtor or creditor number), but you can also enter additional data such as address, contact details, GLN and tax number. This data can be automatically added to the PDF data later in the PDF mapping process if, for example, the customer’s address is not on the PDF document but needs to be imported into your ERP system along with the order data.
Step by step in PDF-Mapper
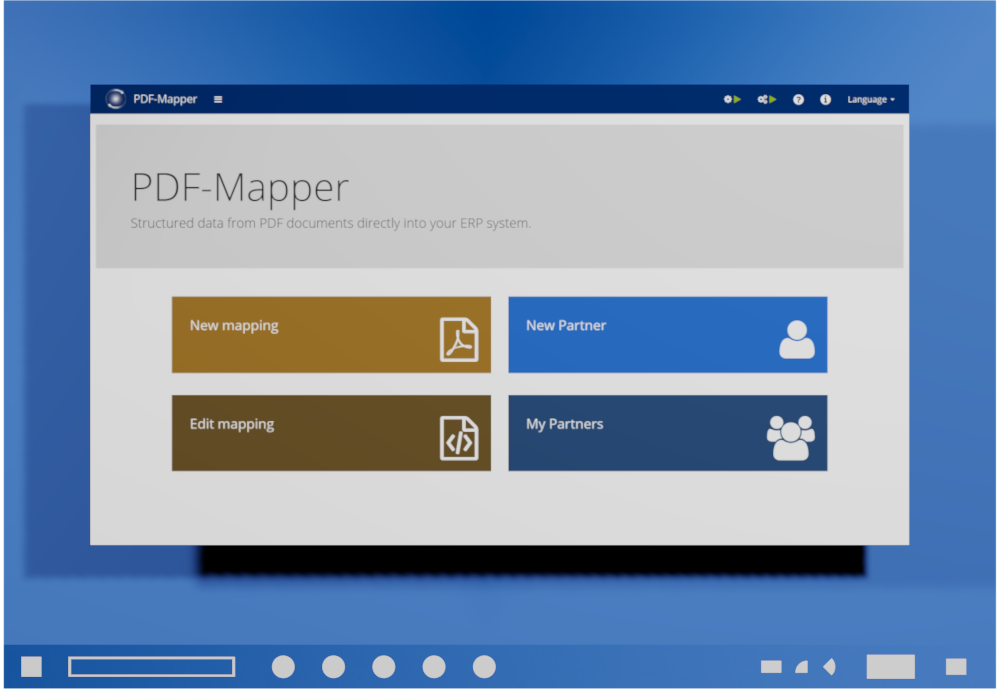
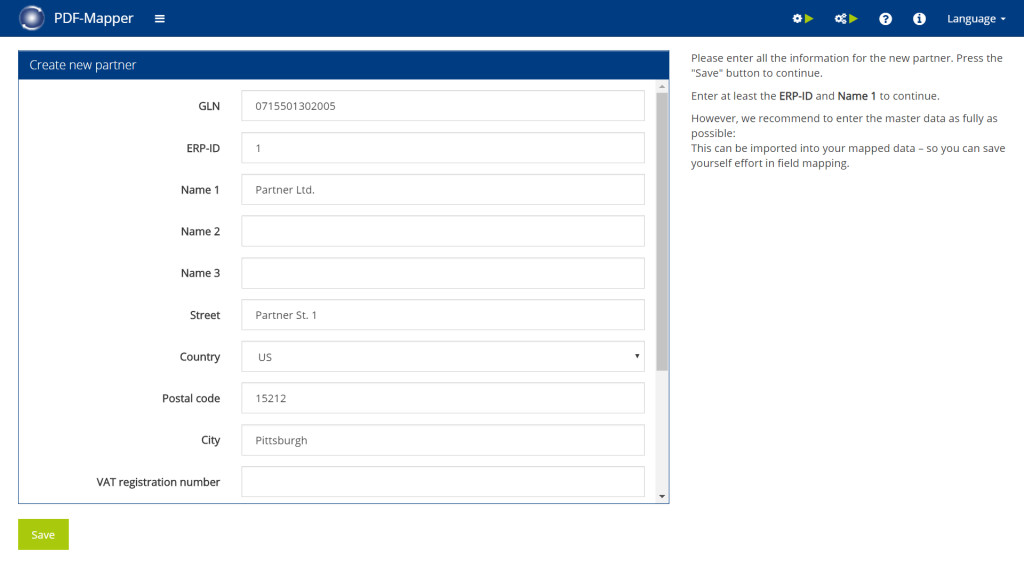
- Click on “New Partner” in the main menu to create a new partner.
- Enter the ERP ID (e.g. customer, debtor or creditor number) and the company name of the partner.
- If desired, enter additional data such as GLN, address, contact information, and tax number.
- Click on “Save”.
Note:
You can change the entered data and delete the partner at any time in the main menu via "My Partners".
Special case 1.1: Processing different PDF document types of the same partner
For example, if you want to automatically process both PDF orders and PDF invoices from the same partner, you can create only one partner and perform steps 2-6 once for PDF orders and once for PDF invoices.
Special case 1.2: A partner sends a PDF document type in multiple layouts
For example, if a partner sends you PDF orders in two different layouts, then you can create two partners with the same ERP ID. The PDF-Mapper will create a separate “BizzTainer ID” for each, under which the PDF mapping will be created.
Special case 1.3: Multiple partners send PDF documents with the same layout
Sometimes several partners may use the same ERP system, for example, to export data as a PDF document. This is especially the case with industry-specific solutions. Here, only one layout has to be entered for several partners. A distinction is then made between the partners using the PDF data, such as address or customer/supplier number. You may have to add special ERP IDs later in the mapping process if the information is not contained in the PDF.
2. Choose document type
What are we doing here?
If an employee is to manually enter data from a document, he or she normally first determines the document type. Is it an order, an invoice or another document? Depending on the document type, the employee enters the data in the appropriate place in the ERP system.
This distinction of the document type must also be made in an automation. In order to structure the data of an order also as order data and to import it correctly into the ERP system, we have to select for which PDF document type we want to create the PDF mapping.
In this step we will also upload a sample PDF, which we will use to perform the PDF mapping.
Step by step in PDF-Mapper
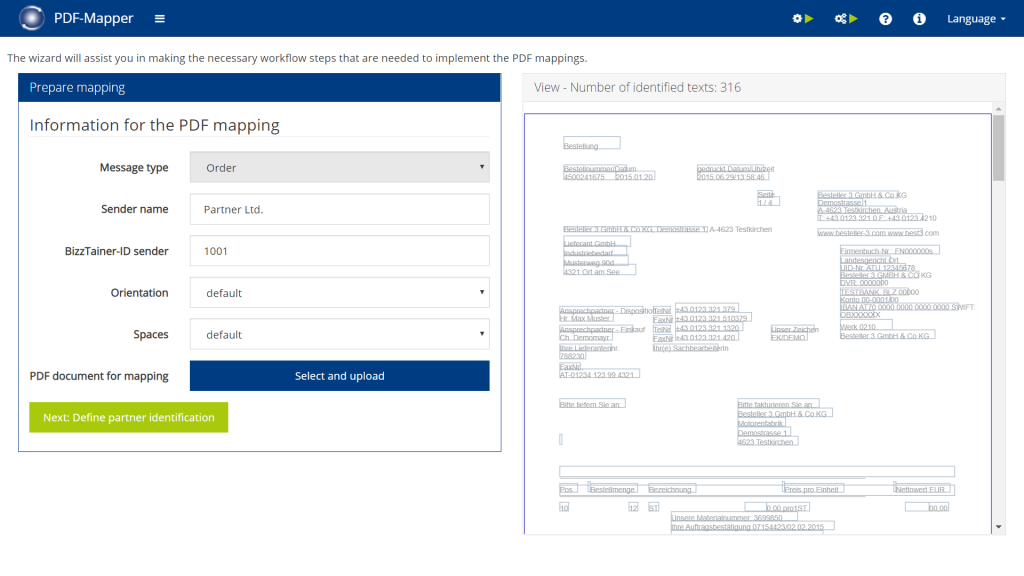
Choose message type:
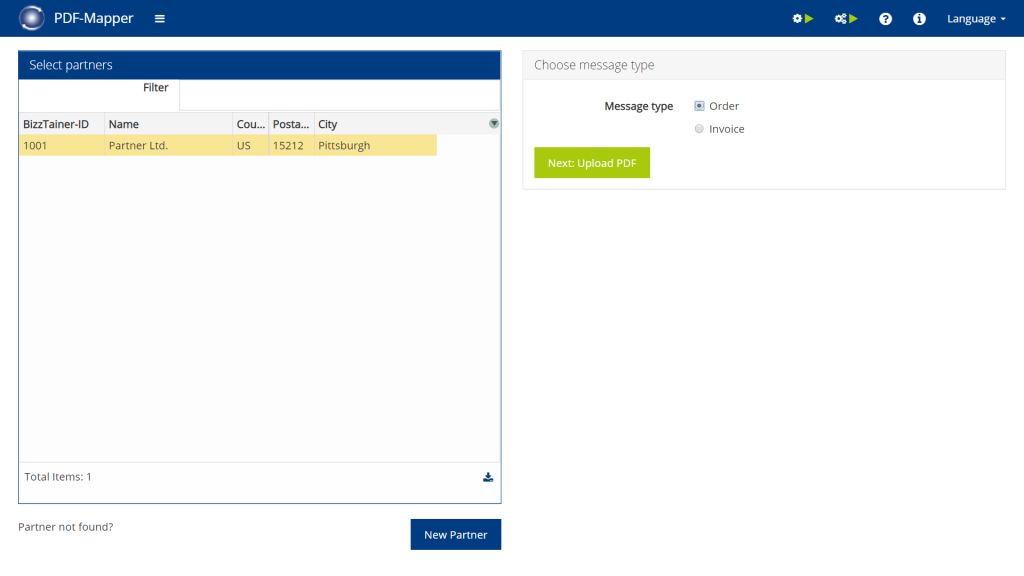
- Click on “New Mapping” in the main menu to create a new PDF mapping.
- Select the desired partner from the list.
- Under ” Choose message type”, select whether you want to create the PDF mapping for orders or invoices (for other document types, see below).
- Click “Next: Upload PDF”.
Other document types:
If you want to process price agreements, delivery notes, or order confirmations, then simply select "Order" here as well. For payment advices select "Invoice".
Upload PDF:
- Select a typical PDF document and upload it.
- If the uploaded PDF document is digitally readable, it appears in the right part of the window with the identified texts. Around each of those texts rectangular text boxes are drawn ( if not, see special case 2.1).
- Click on “Next: Define partner identification”.
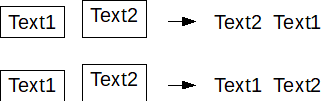
Orientation:
Depending on how the PDF is formatted, the text boxes can be aligned based on the upper left or lower left corners. When copying text into a text tool like Microsoft Word, if Text2 is in front of Text1 as in the image, the alignment is top left (choose "default"). If Text1 is in front of Text2, the document is aligned based on the bottom left corner (choose "Baseline").
Spaces:
Depending on how the PDF is formatted, data may be separated by a number of spaces. These often interfering spaces can either be removed automatically (select "default") or kept (select "keep"). The latter can be useful for processing layouts that present different information in a single text box. Often such layouts look as if they were created with a typewriter. The information can then be separated by their position. For example, item numbers could be placed in the text box from the 5th to the 11th character and the order quantity between characters 21 to 26.
Special case 2.1: An uploaded PDF document does not recognize texts/text boxes
PDF mapping requires PDF documents to be digitally readable. Therefore, PDFs with scanned pages often cannot be processed. Have your partner send you the order or invoice directly from their system as a PDF. Alternatively, you can use external OCR software to create a digitally readable PDF from the fax or scan image.
With our PDF Check you can test whether your PDFs are digitally readable.
3. Identify partner
What are we doing here?
In the document capture process, the sender is the second fundamental piece of information besides the document type. We have already created the partner in the PDF-Mapper, but we need to make sure that he is also always recognized as the sender of his PDF documents.
In order for a partner to be automatically identified, information such as the sender’s tax ID, company name, or email domain can be set as criteria for automatic recognition. These criteria must be present on every PDF document of the partner and should be so unique that they cannot apply to PDF documents of other partners. Therefore, we recommend selecting a combination of several criteria in case of ambiguous information.
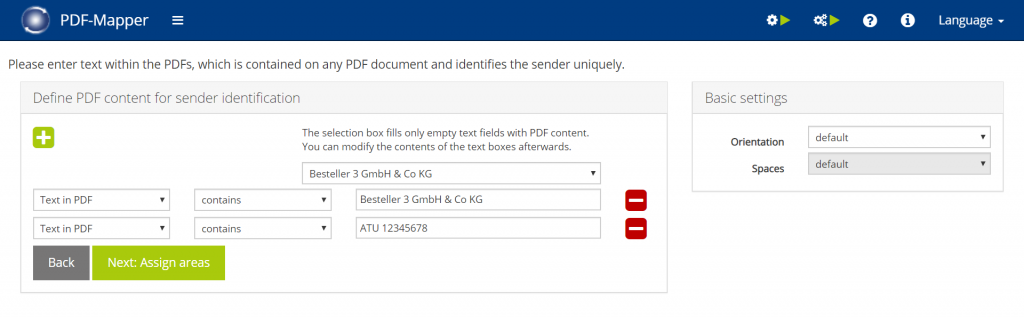
Step by step in PDF-Mapper
- Select a unique partner identifier from the drop-down menu (e.g. company name, tax ID, email address) – the information will be transferred to the criteria field below.
- Adjust the specification in the criteria field if necessary (e.g. shorten e-mail address to e-mail domain).
- Select when the criteria is fulfilled (see “Set criteria”).
- If necessary, add further criteria via the “+” and repeat steps 1-3.
- Continue with “Next: Assign areas”.
Set criteria:
"=": text in PDF exactly matches the information
"contains": text in the PDF contains the information
"starts with": text in the PDF starts with the information
"corresponds to regular expression": With a regular expression you can set, for example, that the PDF can contain either an A or B information. Example: (DE0185|AT6789) means that the partner is identified if the PDF contains either DE0185 or AT6789.
Note:
In the basic settings on the right you can still change the orientation (analogous to the step when uploading a PDF), but not the space setting.
Special case 3.1: Make the partner identification more precise by specifying the position
If you replace “Text in PDF” with another option, you can additionally specify areas on the PDF layout where the set criteria must be found:
- Text at position top, left:
The information must be found around the selected position for the criteria to be met. The position is indicated with coordinates in document units. A deviation from the coordinates can be increased or decreased with the snap range +/-. - Text at position top:
The information must be found around the selected line so that the criteria is fulfilled. The line is indicated with the horizontal coordinate, the possible deviation with the snap range. - Text at position left:
The information must be found around the selected column for the criteria to be fulfilled. The column is indicated with the vertical coordinate, the possible deviation with the snap range.
4. Assign areas
What are we doing here?
As explained in our article around PDF mapping, we basically create a “map” of the PDF layout. Similar to how mountains, forests, and bodies of water are recorded on a map, we first tag the different document areas on the PDF.
Business documents like orders or invoices can usually be divided into different document areas, such as the header, item and footer area. All three document areas can contain important data that must be extracted. Otherwise, the recipient of the business document does not have all information needed, for example, to deliver the ordered items or pay the invoice on time.
Depending on the document type, the header area on the first page contains important information such as order number, invoice date, buyer address or supplier details. On the following pages, there is also often an abbreviated header area where some of this information is repeated.
The item area can extend over several pages and is often arranged like a table in rows and columns. It contains, for example, a list of items that are ordered or invoiced. Usually, the columns each have a column heading indicating the meaning of the data – e.g. item number, quantity or price. The rows are often numbered consecutively.
The footer area is often located on the last page below the position area and contains summarizing or additional information.
For PDFs to be automatically captured and properly processed with the PDF-Mapper – even with complex PDF layouts and adventurous data compilations – the individual document areas must be marked just once.
Step by step in PDF-Mapper
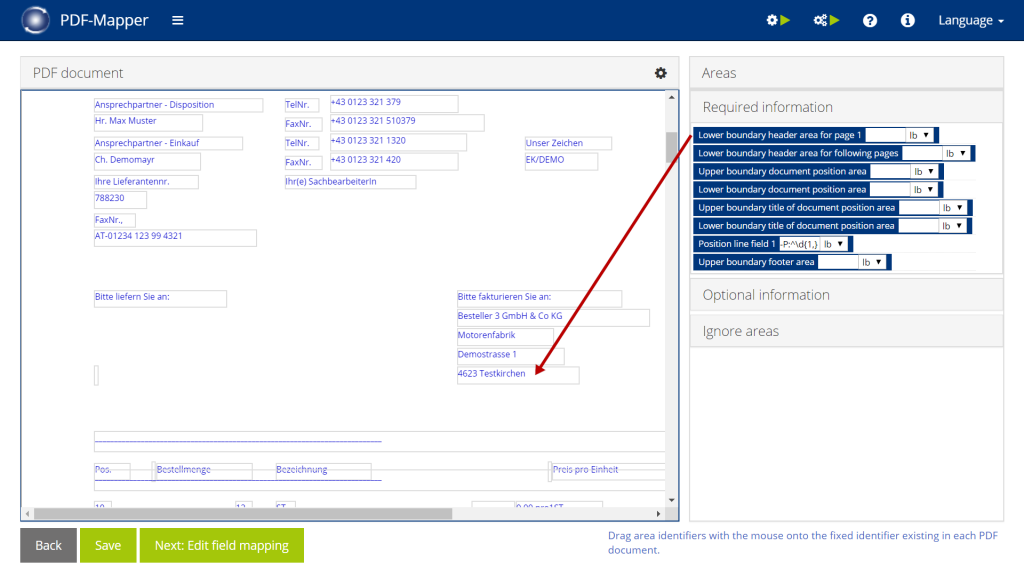
- One by one, drag and drop the markers under “Required information” onto the corresponding fields that mark the beginning or the end of the document area:
- Lower boundary header area for page 1:
Select the horizontally lowest field of the header area on page 1. - Lower boundary header area for following pages:
Select the horizontally lowest field of the header area on page 2 (if existing, otherwise select the same field as in step 1). - Upper boundary document position area:
Select the horizontally highest field of the entire position/item area. - Upper/Lower boundary title of document position area:
In the position/item area, select the horizontally highest and lowest fields out of the column headers. - Position line field 1:
In the position area, select the first field in the first line (usually the first position line number). - Lower boundary document position area:
Select the horizontally lowest field of the entire position area. - Upper boundary footer area:
Select the horizontally highest field of the footer area on the last page.
- Check if the selected fields are left or right aligned (see note below).
- Add optional information or areas to ignore if necessary (see note below).
- Click “Save” to save the current state.
- Click “Next: Edit field mapping” to continue.
Which fields to mark?
If there are several fields on a horizontal line, it usually does not matter which field you select. All fields you mark must appear in all PDF documents with this layout for automatic processing to run smoothly. If you are not sure, compare a few PDF documents with the same layout to find these fields. Also make sure that you use fields with unique texts. For example, "Pos" is often used as header of the position line, but it can also sometimes be found in the document footer under "Pos"tal address. In this case, use another field if possible or refer to the excursion under step 5 (use -P: and regular expression, more information in product manual).
Selecting a field with multiple markers:
A field can be marked several times.
Left- and right-aligned fields:
Check whether the text boxes (not the texts themselves!) are left or right aligned in their column. Then select either "lb" for left-aligned or "rb" for right-aligned in the drop-down menu of the marker. If you are unsure, use "lb" first and then check the mapping result. If the content is not recognized correctly, switch to "rb".
Optional information:
If there are tabular details in the header or footer (e.g. details on discounts or tax rates) or repetitive remarks (e.g. references such as project numbers and cost centers), you can mark these with the markers under "Optional information". This allows for reliable and structured capturing of these entries as well.
Ignore areas:
If you want to ignore certain areas, you can mark them with the markers from "Ignore areas".
Special case 4.1: A PDF document has no footer after the position area
In this case, not all ” Required information” must be assigned: The “Upper boundary footer area” and “Lower boundary document position area” can be skipped.
Special case 4.2: A PDF document was made digitally readable with OCR text recognition
PDF documents made digitally readable with OCR text recognition often have text boxes that are not “neatly” arranged. The positions of these text boxes shift by a few pixels in different directions. In order to still capture such PDFs reliably, one can extend the capture range. The capture range specifies the deviation of the text boxes’ positions on the PDF within which the information is searched.
So if we normally find the information at position (10, 20) on the PDF, we can increase the snap range to x=5 and y=5 so that the PDF mapper looks for the information between positions (5, 15) and (15, 25).
To set the capture range, click the settings icon in the “PDF document” section. Then set the desired capture range. For OCR text recognition, you should increase the values for x and y. A PDF document in A4 portrait format is normally read with x=595 units and y=842 units.
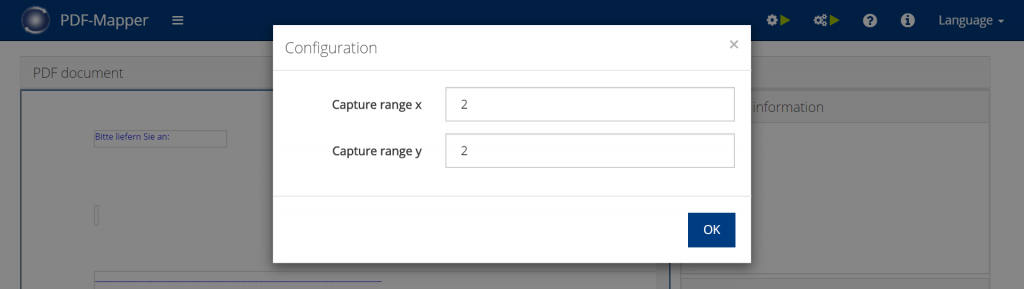
Special case 4.3: A PDF document has centered text boxes instead of left- or right-aligned ones
For centered text boxes, you can increase the capture range as in special case 4.2. Click on the settings icon in the “PDF document” section and increase the capture range x. You do not need to change the capture range y.
Special case 4.4: The capture range should be changed only for one captured field
To change the capture range for a particular field, you can enter a mapping rule in the input field in the blue element:
- -X:{n} with a positive number n for the x capture range (to the right and left from the position).
- -DY:{n} with a positive number n for the y capture range (up and down from the position).
- -Y:{n} with a positive number n for the y capture range downwards.
- -Y:{n} with a negative number n for the y capture range upwards.
5. Map fields
What are we doing here?
The field mapping is the central step in PDF-Mapper to enable automatic PDF data processing.
Do you recall what semantic readout does? If not and you do not want to read the extensive explanation in the first part of our series on PDF mapping, then here is a short version: To automatically capture the data from PDF documents and import them into ERP and other business systems, we first have to convert them into structured data. In order to structure the PDF data, we have to assign a meaning to each data element. This means that the order number must be marked as an order number, the delivery date as a delivery date, and the article numbers as article numbers. This is what we call semantic readout.
We also need to find this data on every PDF of the layout. To accomplish this, we mark the coordinates where the data is located on our PDF mapping “map”. These coordinates can be absolute or relative to an anchor. For example, if the order number is always found at the same position, we record this absolute position. If the order number is found in different positions from PDF to PDF, but always behind a text “Order No.”, we record the relative position to this anchor text.
In PDF-Mapper, semantic readout and PDF mapping of the data are combined in one step. You show the PDF-Mapper once where the data you want to capture automatically is located and at the same time assign the data its meaning. The PDF-Mapper memorizes the information and finds the relevant data on every further incoming PDF document with this layout!
With the field mapping, PDF-Mapper then creates a basic XML data structure from each PDF in which all relevant data is automatically populated along with its meaning. This structure can be customized in the further process steps to format the data as desired.
IMPORTANT:
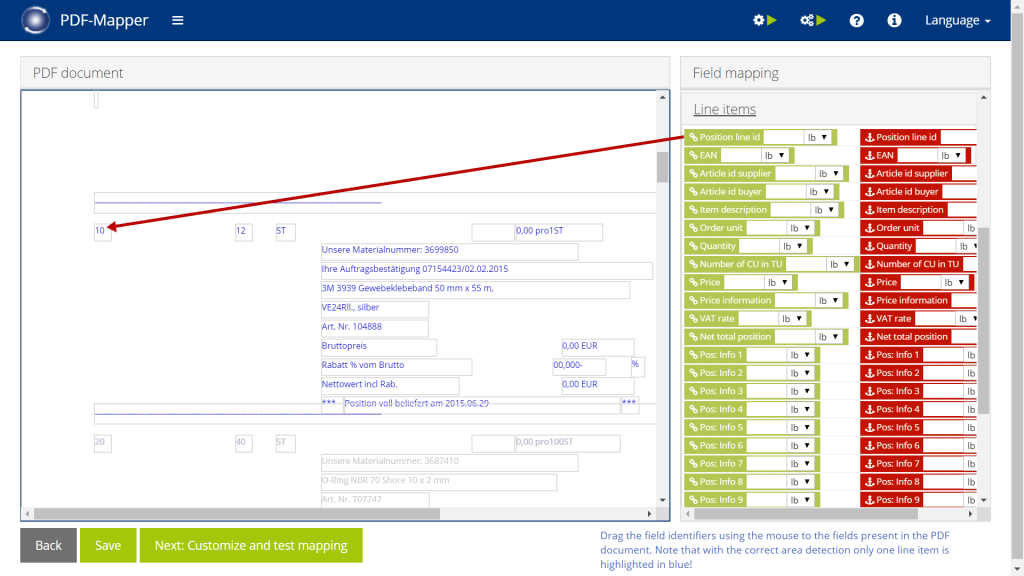
Only the fields of the first row in the position area should be displayed in blue, while the other rows should be grayed out. If the contents of all rows are displayed in blue, then the area assignment needs to be adjusted. After creating the field mapping, you cannot change the area assignment without deleting the complete field mapping.
Step by step in PDF-Mapper
- Find the data fields on the PDF that you would like to capture.
- Browse the categories on the right to find the appropriate meanings for the data fields.
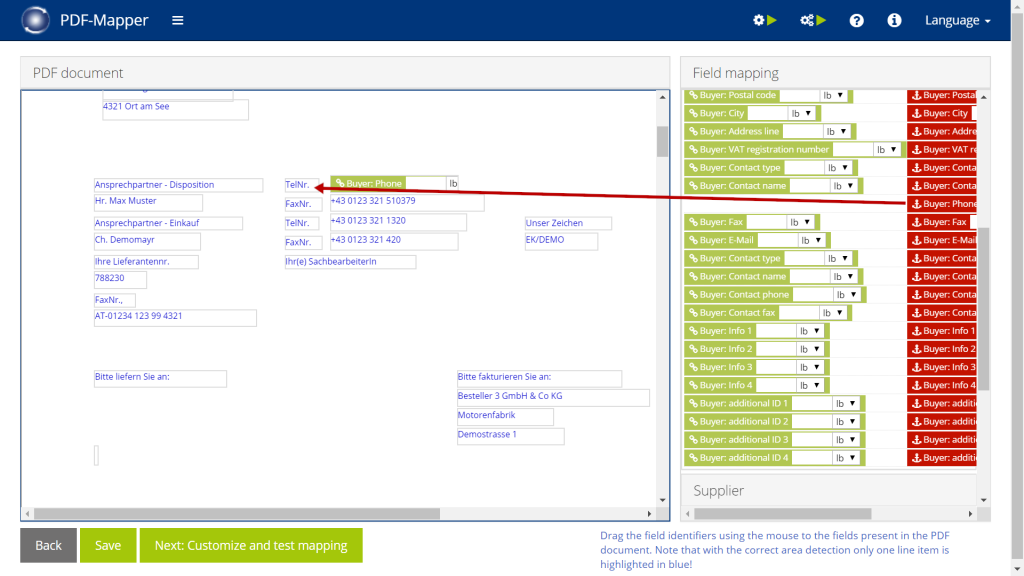
- Drag and drop the green elements onto the matching data fields.
- If a data field can move from PDF to PDF, drag the matching orange anchor to a text that points to the data field and/or is always in relative proximity to the data field.
- Verify whether the text boxes of the selected data fields are left- or right-aligned (see below).
- Click “Save” to save the current status.
- When you have marked all relevant data on the PDF document, click “Next: Customize and test mapping” to continue.
Marking fields multiple times:
It is possible to assign several elements to one field on the PDF document, for example with a green and an orange element.
Mapping fields in the position area:
In the position area, data is normally arranged in a table with rows and columns. Here, you only need to assign the relevant data in the first row to be able to capture all rows automatically. If you match the relevant data with the corresponding meaning via the green elements (e.g. article number 51203), it will always be recognized on the basis of its relative position to the top of the table. If data fields may move in this relative position (e.g. sometimes located in first line, sometimes in second), additionally mark a matching text with the matching orange anchor (e.g. Art.No. in front of 51203). This will search for the marked green element relative to the anchor.
Left- and right-aligned fields:
Check whether the text boxes (not the texts themselves!) are left or right aligned in their column. Then select either "lb" for left-aligned or "rb" for right-aligned in the drop-down menu of the marker. If you are unsure, use "lb" first and then check the mapping result. If the content is not recognized correctly, switch to "rb".
Digression: Mapping rules and regular expressions for special cases
In some cases, data cannot be clearly assigned with a meaning via drag and drop only, e.g. because the data is located in different places from item to item or from PDF to PDF and could be confused with other data.
To ensure that such data can also always be mapped precisely and that all PDF documents can be processed automatically without errors, PDF-Mapper provides a number of mapping rules and regular expressions that can be entered in the white input area of the green and orange elements.
Mapping rules can be used to increase capture ranges, combine texts from several text boxes and, if necessary, separate them with a character (see special case 5.2).
Regular expressions can be used to recognize data based on their properties and patterns. This makes it possible, for example, to find all words in a list beginning with S and ending with D. Or to recognize item numbers by their sequence of 6 consecutive digits (see special case 5.1).
Mapping rules and regular expressions can be combined to recognize and process all data 100% correctly.
Special case 5.1: Data must be clearly recognized by its pattern
Use regular expressions (see digression) to be able to recognize data unambiguously via their pattern. A regular expression must always be preceded by -P: in the input field, e.g. -P:\d{1,}, where \d{1,} is the actual regular expression.
The following table lists common regular expressions used to recognize specific patterns:
| Regular expression | Description |
| abc | Finds strings in which ‘abc’ occurs at least once. |
| [abc] | Finds strings in which either a, b or c occurs. |
| [0-6] | Finds strings containing a number between 0 and 6. |
| ^a | Finds strings that start with an ‘a’. |
| $a | Finds strings that finish with an ‘a’. |
| ab[cd] | Finds strings containing an ‘ab’ and a c or d (abc or abd). |
| abc\B | Finds strings that contain an ‘abc’ but do not end with it. |
| ^\d{6}$ | Finds strings that consist of exactly 6 digits. |
| .ab | Finds strings that consist of three characters and where the last two characters are ‘ab’. |
| .+ | Finds strings that consist of at least one character. |
| ^\d{1}.* | Finds strings that start with a digit and then contain any number of arbitrary characters. |
Special case 5.2: Text boxes must be merged
Use mapping rules (see digression) to merge data from multiple text boxes and separate them with a character, if necessary. The mapping rule can be entered in the input field of the anchor or the green element. Several mapping rules can be listed one after the other.
The following table lists frequently used mapping rules:
| Mapping rule | Description |
| -P:{regular expression pattern} | Introduces a regular expression. |
| -J:{m} | Merges all text boxes that are m units to the right of the selected text box. |
| -R:{m} | Merges all text boxes that are m units to the left of the selected text box. |
| -T:{m} | Merges all text boxes that are m units above the selected text box. |
| -B:{m} | Merges all text boxes that are m units below the selected text box. |
| -C:{chars} | Separates the merged text boxes with a character (| or __ or , or %32 for spaces). |
Special case 5.3: Danger of mixing up item numbers
Sometimes it can happen that item descriptions in positions are of different lengths and extend over various numbers of lines. If item numbers are specified below the item description, they no longer have a fixed relative position to the beginning of the line.
Often there is also a risk of confusion, because the item descriptions also contain sizes or other information that consists of number strings similar to the item numbers.
But since item numbers usually follow a certain pattern, you can assign a green element to the item number as usual. Then you set an anchor to the same field and enter a suitable regular expression in the input mask (see digression above).
For example, if the part number is always a 6-digit numeric string, you would enter P:^\d{6}$. Where -P: is the identifier for the following regular expression ^\d{6}$, which says that the text has 6 numeric characters at the beginning (^) (\d{6}) and then ends ($).
AIn this way, you can use patterns to automatically and reliably extract item numbers or other information from any PDF document.
Special case 5.4: An address has different number of lines from PDF to PDF
Sometimes addresses may have a varying number of lines (e.g. sometimes a delivery address with 4 lines, sometimes with 5 lines).
Für solche variablen Adressangaben empfehlen wir eine Kombination von zwei Zuordnungsregeln. Ziehen Sie das passende grüne und orangene Element auf das oberste Adressfeld. In das orangene Anker-Element schreiben Sie -B:{m} mit m Einheiten, um alle Felder in m Einheiten unter dem obersten Adressfeld zusammenzufügen. Dahinter vermerken Sie z. B. -C:|, um die Felder mit | zu trennen.
In this case, we recommend a combination of two mapping rules. Drag the matching green and orange element to the topmost address field. In the orange anchor element write -B:{m} with m units to merge all fields within m units below the top address field. Behind it, note e.g. -C:| to separate the fields with |.
Set m large enough to be able to capture addresses with the most number of lines. Based on these mapping rules, you can further modify the address in the next step: “Customize and test mapping”.
6. Test and customize mapping
What are we doing here?
Almost done! In the final step of the actual PDF mapping process, we can check and adjust the extracted PDF data. Thus, we ensure that the data can be transferred to the ERP system correctly and as desired.
For example, dates can be transformed into a standard format (07.12.2014 → 2014-12-07), decimal numbers can be re-formatted (2’780.90 → 2780.90) and unnecessary texts can be removed (order no. 345234 → 345234). Along with many more automatic data adjustments, ID numbers from tables (e.g. missing GLNs or item numbers) can be added to the extracted data automatically. Once set up, the data adjustments are automatically performed for each incoming PDF of the same layout.
After these customizations, the data extracted from the PDF is available in a XML, the so-called neutral format. You have now successfully completed the PDF mapping!
If you are performing a PDF mapping for the very first time, you may want to set up the integration with the ERP system and the automatic validation afterwards. If you have already done so, you can start the automatic processing for PDF documents of this PDF layout immediately!
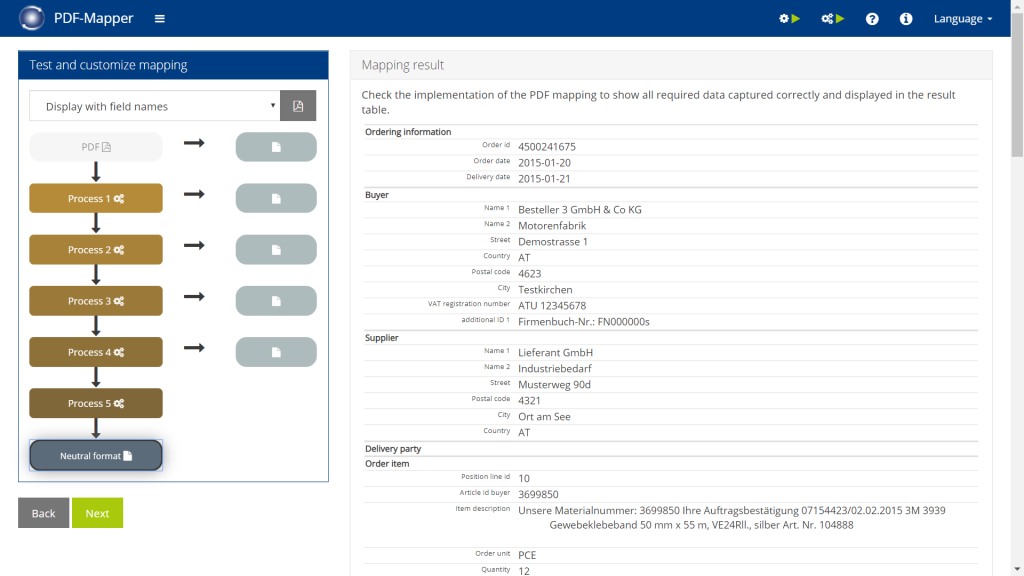
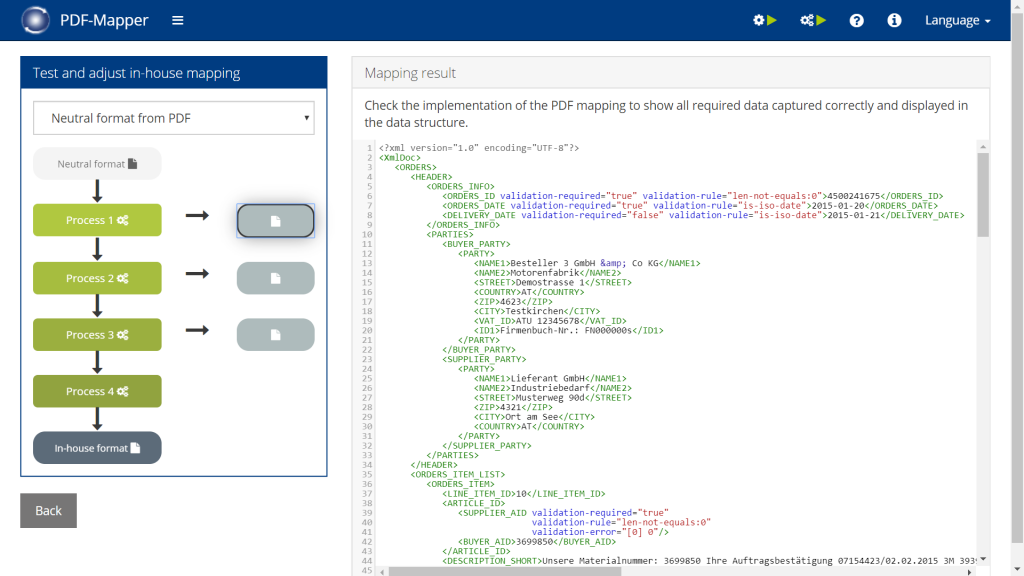
Step by step in PDF-Mapper
- Click “Neutral Format” to display the extracted PDF data.
- In the top-left drop-down menu, select “Display as XML”, “Display with data element names” or “Display with field names” depending on your preference.
- If you want to refine data, click on the individual processes 1-5 to make changes.
- Select the “Editor View” or “Function View” in the upper right corner depending on your preference – we recommend to use the simple “Function View” where numerous “Function blocks” are available (see digression below).
- Select the desired function blocks per process step and configure the appropriate settings (detailed documentation in the PDF Mapper manual).
- Alternatively, you can manually change the XSLT processing in the “Editor View”. This is only recommended for users with knowledge of the XSLT programming language.
- Click “Save” to save the current state.
- Check the changes under “Neutral format” and repeat steps 3-8 if necessary.
- Click “Apply changes” to activate the changes for automatic processing.
Test data:
Normally, you should use a PDF document during the mapping process that, if possible, contains all occurring instances where data has to be adjusted. If this is not possible, you can import additional PDF documents via the "Manage test data" button (with PDF icon in the top left). The button turns green when a test PDF is selected.
The 5 process steps:
There are five process steps, in order to be able to accomplish several processing steps at a data element. The process steps are intended for the following operations:
1+2: Clean up texts and prepare them for further function blocks.
3: Harmonize data (e.g., convert date and number formats)
4: Recognize addresses, post-process data
5: Recognize variable address data
Digression: Function blocks
The function blocks contain the most frequently used adjustment steps for the preparation of the extracted data. Click here for a list of the available function blocks.
The blocks can be used very flexibly by specifying different parameters. Select a block, then the desired XML element and complete the respective specifications depending on the function. All functions are integrated with just a few clicks and can be used without further XSLT knowledge.
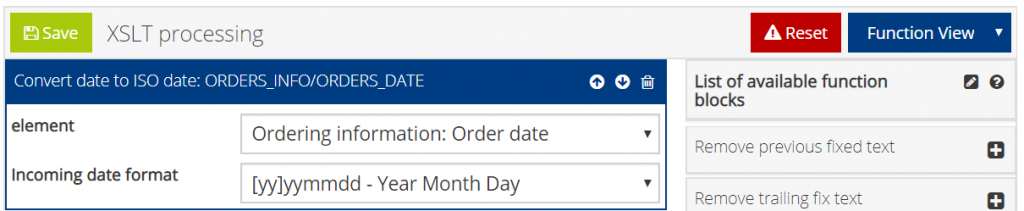
Example 6.1: Automatically format a date
Select the function block “Convert date to ISO date”. This function is used to convert a date from a variety of formats to ISO date format.
The first field “Element” determines to which XML element of the captured PDF document the function is applied. In the example this is the order date. The second field “Incoming date format” must match the present format of the order date.
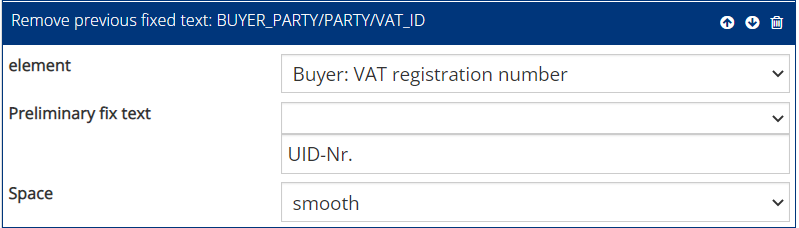
Example 6.2: Automatically remove unnecessary texts
Select the function block “Remove previous fixed text” to remove texts before the desired text, e.g. “Order number:” in the extracted field “Order number: 9067546”. The first field “Element” determines to which XML element the function is applied. In the ” Preliminary fixed text” drop-down menu, the text to be edited can be selected (in the example, “Order number:”). Once it has been copied to the field below, the section of text to be kept can be removed so that only the initial text to be removed is visible. Spaces can be removed/smoothed or left.
Similarly, you can use “Remove trailing fixed text” to remove text after the desired text.
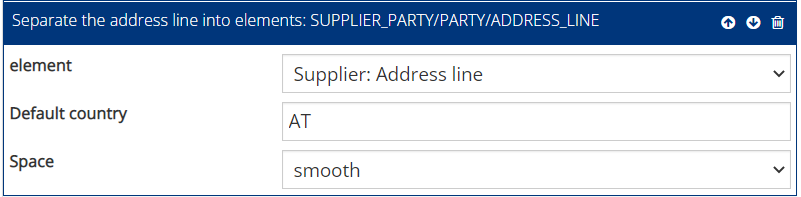
Example 6.3: Automatically split addresses
This step follows, for example, special case 5.4: Select the function block ” Separate address line into elements”. Under “Element” select the XML element to be edited. The PDF-Mapper will now split the address into individual fields using the “|” character. Under “Preset Country” you can set a country that will be used if no country is specified on the PDF. Spaces can be removed/smoothed or left.
7. Enable ERP Integration
What are we doing here?
This step only needs to be performed globally once per interface to the ERP and other business systems. It then applies to all PDF mappings that are to transfer data via this interface.
ERP systems and other software applications are a dime a dozen. To enable you to transfer the data from the captured PDF documents to any software, you can use PDF-Mapper to convert the neutral format to any in-house format – i.e. the format you need for your interface.
Step by step in PDF-Mapper
Create in-house mapping:
For this process step you need IT knowledge about XSLT processing. If this knowledge is not available in your organization, you can contact the PDF-Mapper team to perform the XSLT processing.
- Click “Adapt in-house mapping” in the mapping overview.
- Adjust the code in the four process steps as desired.
- Click “Save” to save the current state.
- Review your adjustments by clicking “In-house format” to view the final result.
- When you are satisfied, click “Apply changes” to activate the changes for automatic processing.
Non-XML formats:
If you want to create non-XML formats such as CSV, SAP IDoc or Flatfile structures as an in-house format, the adaptations from XML to the non-XML format are only made in the fourth process step. In this case, you should typically also use the CSV format setting in the application settings.
Test data:
For testing, you can also select "Neutral format from test data" from the upper drop-down menu, so that test data is loaded that contains all possible data elements (and not only the data fields contained in the standard PDF).
Import data into ERP system
- Find the import folder of your ERP system or other business software for the extracted data.
- Call up the application settings via the navigation bar in the PDF-Mapper.
- Under “Order processing” and “Invoice processing”, select the “Output directory for extracted data”.
- Select the import folder of your ERP or other business software as the output directory.
- Click on “Save”.
Special case 7.1: Multiple interfaces for various PDF document types
The in-house mappings for orders and invoices are created separately. However, if you want to process e.g. orders and order confirmations (under the common configuration orders) to different output formats, you can distinguish the validity of individual XSLT mapping rules e.g. via the mode specifications, i.e. <xsl:template match=“{feldname}“ mode=“order“>… and <xsl:template match=“{feldname}“ mode=“orderresponse“>…
8. Configure validation
What are we doing here?
You only need to configure this step globally once per document type. The validation then applies to all PDF mappings of this document type.
To prevent data from PDF documents from being transferred to the ERP system even though important data is missing or incorrect, there is automatic validation. There you can set validation rules that must be fulfilled. If a PDF document does not meet the validation rules, the data can be manually adjusted in the PDF-Mapper or output to a special directory for faulty documents.
Step by step in PDF-Mapper
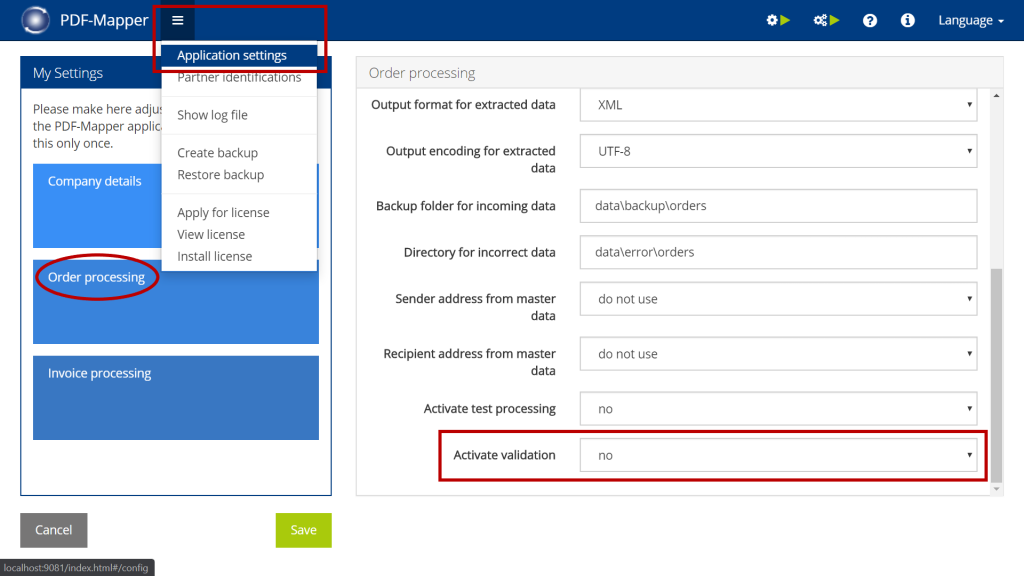
Enable validation:
- Aktivieren Sie die Validierung in den Applikationseinstellungen unter „Bestellverarbeitung“ und/oder „Rechnungsverarbeitung“.
- Legen Sie dann in der „Bestellvalidierung“ oder „Rechnungsvalidierung“ fest, ob fehlerhafte PDFs in ein Fehlerverzeichnis ausgegeben oder im PDF-Mapper korrigiert werden sollen.
- Ändern Sie ggf. den Ordnerpfad für das Fehlerverzeichnis oder die Belegkorrektur.
- Aktivieren Sie ggf. die Option, dass Sie per Nachricht informiert werden, wenn PDFs fehlerhaft sind.
- Activate the validation in the application settings under “Order processing” and/or “Invoice processing”.
- Then specify in “Order validation” or “Invoice validation” whether incorrect PDFs should be output to an error directory or corrected in the PDF-Mapper.
- If necessary, change the directory path for the error folder or the document correction.
- If desired, activate the option to be notified by email when PDFs contain errors.
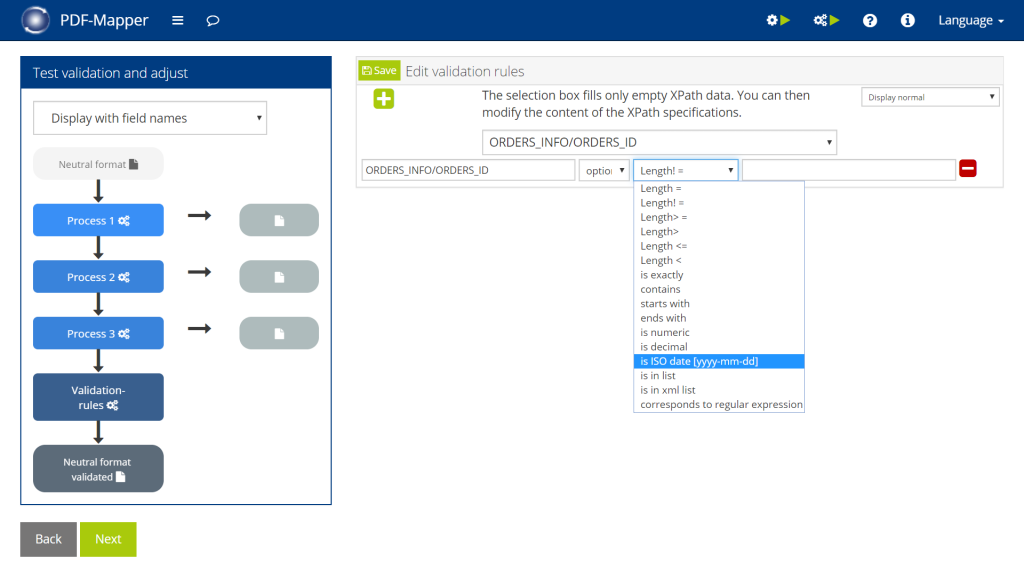
Configure validation:
- To set the validation rules, go to “Validation” under “Edit mapping”, click “Customize validation”, and then click “Validation rules”.
- From the drop-down menu, select an XML element for which you want to create a rule.
- Specify whether the selected element must (“required”) or can (“optional”) be present on a PDF document.
- Select a function from the drop-down list and make the appropriate specifications, if necessary.
- Click “Save” to save the current state.
- Check the validation rules via “Neutral format validated”.
- Click “Apply changes” to activate the validation for automatic processing.
Extend display:
If you select the "Display extended" setting, you can add a description text to each rule, which will also be displayed in the document correction view.
The 3 process steps:
You can use process steps 1-3, which precede the validation rules, to write complex evaluations via XSLT in a data field, for example, which you can then evaluate in the validation rules. Usually, you will not have to do any configuration here.
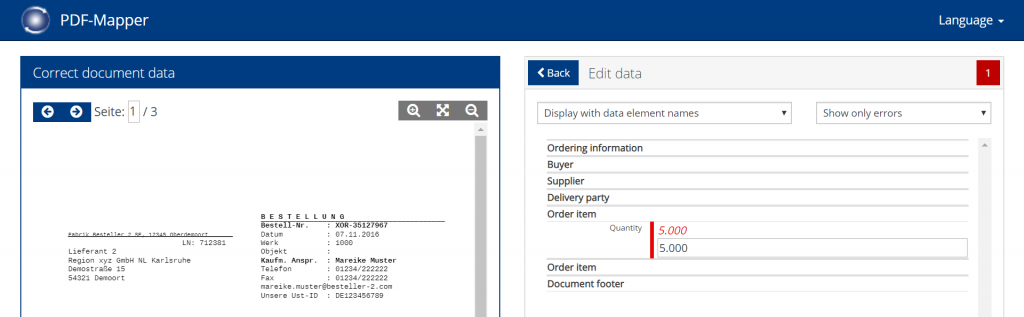
Correct faulty PDFs:
- To correct a faulty PDF document, you can click on the “Document overview for correction” in the top navigation bar.
- Select the incorrect document from the overview and click “Correct the document”.
- Correct the incorrect fields marked in red.
- Click on “Check” to test whether your changes comply with the validation rules.
- Then click on “Process” to transfer the document to your ERP system.
Special case 8.1: Be notified by email about faulty documents
In the application settings, you can define whether messages are to be sent to one or more email accounts as soon as an incorrect document appears. The messages can be distributed to different email addresses depending on the partner.
Result: Automatically process incoming PDF documents in the background
What is our result?
After we have performed one or more PDF mappings, configured the application settings, and enabled ERP integration, PDF documents can be captured, processed, converted to EDI/XML files, and imported into your ERP system in a fully automated process. The automatic conversion from PDF to your desired format takes place entirely in the background while you can devote yourself to other tasks!
Incoming PDF documents can be manually dropped into an import folder or automatically fetched from an email inbox.
What happens in PDF-Mapper?
- A PDF document arrives in the import folder or the selected email inbox.
- The PDF is placed in a backup directory for received data.
- It is checked whether the PDF can be assigned to a stored partner – if not, it is stored in an error directory, otherwise it is processed.
- The PDF is captured, processed, converted into the desired EDI/XML format and exported to an output folder – from there it can be automatically imported via the desired interface of the ERP system.
- If validation has been activated and data in the PDF is missing or incorrect, the data can be adjusted manually.
Note:
For the automatic conversion to be performed correctly, the appropriate PDF mapping must be configured correctly.
How can I get started?
Wenn Sie bis hierhin gelesen und den PDF-Mapper noch nicht installiert haben, ist es jetzt höchste Zeit! Starten Sie Ihren kostenlosen Test oder kontaktieren Sie unser freundliches Vertriebsteam.
If you’ve read this far and haven’t installed PDF-Mapper yet, now is the time! Start your free trial or contact our friendly sales team.